Introduction
Recently, Cribl began releasing REST Collector IO Packs – Packs that contain everything you need to deploy REST-based data collection for many types of data including EDR (Crowdstrike, SentinelOne, etc), Authentication (Okta, Duo, etc.), AI (OpenAI, Gemini, etc.), Microsoft Entra, and many others.
Why do this when Cribl has long had a Github repository of freely available REST Collector configurations? In short:
- IO Packs include pre-configured Collector Sources along with Event Breakers – no need to copy/paste each item.
- IO Packs leverage Pack variables to simplify configuration. For example – the Crowdstrike REST IO Pack includes four Sources, each of which requires a Base URL, Client ID, and Client Secret. Pack variables allow you to set these values once instead of for each Source!
- IO Packs include routes and pipelines that perform common functions like blank/null value reduction and formatting for common output formats.
- IO Packs include a detailed README with information on how to configure and deploy them as well as available tuning options.
Deployment Considerations
The Crowdstrike REST IO Pack requires a properly provisioned API client and key. To create this, as a Crowdstrike Administrator navigate to Support and Resources->API clients and keys:

Click Create API Client:

Add a Client name and (optional) Description. The API Client requires Read access to the following Scopes:
- Alerts
- Hosts
- Vulnerabilities
After you click Create, you will see the three pieces of information needed by the Crowdstrike Pack – be sure and save them somewhere!

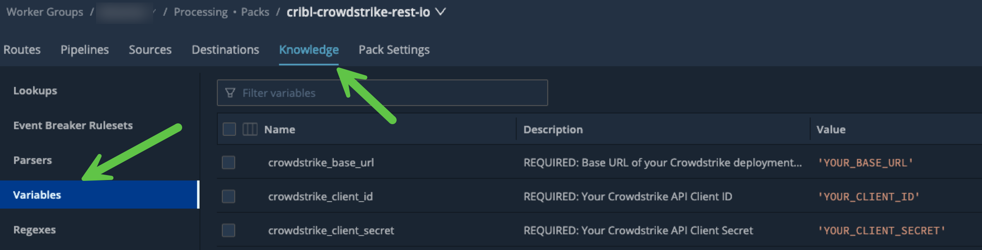
In the Crowdstrike REST IO Pack, navigate to Knowledge->Variables and enter the above information.
The Base URL and Client ID variables must be surrounded by single quotes because they are both JavaScript inputs. The Client Secret should not have quotes because it’s an encrypted string.
Before proceeding with the next step, you must perform a Commit/Deploy – this ensures the Worker Group members have all the necessary configuration items.
Verification
For each of the three Collectors, perform a Run (use the default settings) to ensure there are no issues. Each of them should return events like below:

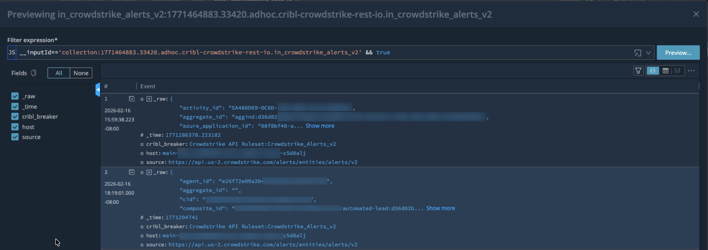
You may also want to save each of the runs as a sample file for use later in case you need to update the pipeline(s).
SIEM Integrations
The Crowdstrike REST IO Pack ships with two SIEM output format options – Splunk and OCSF. It’s critical that only one is enabled since they conflict with each other. The output must be set for each of the three pipelines: cribl_crowdstrike_alerts_v2, cribl_crowdstrike_vulnerabilities, and cribl_crowdstrike_devices.
Splunk
To configure Splunk as the destination format, enable the following two Pipeline Functions:
You can adjust the values of the Splunk index, sourcetype, and source by editing the values in the final Eval:

OCSF
To configure OCSF as the output format, enable the Chain function:

Destination Configuration
The Pack’s routes come pre-configured to send all events to the Worker Group’s Routes. This means that you must add a routing entry that sends the Pack data to your desired Destination. Since you also must choose a pipeline, you can either just use passthru or create your own “Pack Post-processing” pipeline!
If you are upgrading from a previous version of the Pack and already have a Default Destination configured, you can update the Pack pipeline’s Destinations to default:default to continue using this configuration.
Your other option is to add a Destination directly into the Pack. While not ideal, it works just fine.
Final Configuration
Now that everything is tested, the output format has been set, and the Destination(s) chosen, all that remains is to schedule the Collectors. If you are happy with the following defaults then just choose Schedule->Enabled and then click Save.
- AlertsV2: Every 5 minutes with State Tracking enabled. The first run will gather the previous 7 days of Alert data.
- Vulnerabilities: Every 30 minutes with State Tracking enabled. The first run will gather the previous 24 hours of updated Vulnerabilities.
- Devices: Once/day with no State Tracking.

Data Types
Crowdstrike API docs can only be accessed by Crowdstrike customers/partners. However, you can get a reasonable outline of what the API provides via the Crowdstrike Falcon Python SDK (falconpy).
The Crowdstrike REST IO Pack includes support for three data sources:
Endpoint Alerts V2
The “new” Alerts V2 endpoint includes alerts from all products for which you are licensed e.g. Endpoint Protection, Identity Protection, etc. Key fields include:
product: The Crowdstrike product that generated the alert.severity_name: The severity of the alert e.h. High, Low, etc.display_name: The short name of the alert e.g. “Unusual service access to an endpoint“.- … and many, many other fields.
This Collector should be run often (defaults to every 5 minutes) so that Alerts are ingested soon after they are generated.
Vulnerabilities
If you are licensed for this feature, than this endpoint will return detailed information about vulnerabilities for each sensor host in your environment. Each Vulnerability event contains information such as:
- CVE:
id,score, etc. - Host:
hostname,os,ip address, etc. - Crowdstrike-specific:
rating,remediation, etc.
This Collector does not need to run very often – every 30 minutes by default is fine. It uses the updated_timestamp attribute to only ingest Vulnerabilities updated since the last Collector run.
Host/Device Details
This endpoint provides details on each device with a Falcon Sensor installed. It contains detailed information on each endpoint, including host, network, domain, and “last login” data.
This data is especially useful for providing asset metadata for a SIEM. For example, the SA-CrowdstrikeDevices for Splunk Enterprise Security Splunk Add-on uses this information to build an Asset list for enriching events. Other SIEMS have similar capabilities.
This Collector will ingest all devices each time it runs, so it should be run no more than once/day (the default). While it could use the modified_timestamp field, doing so might cause devices to “fall off” depending on the destination.


